The flavour profile is absolute perfection; you’ve survived the crumb coat. You’ve successfully wrestled the fondant. But you step back, look at your creation, and think… “It’s missing something.”
It’s missing the drama. The sparkle. The cherry on top (literally).
Welcome to my ultimate guide to cake toppers. We’re going way beyond just sticking a name on a tier. We’re covering:
Table of Contents
What is a Cake Topper? (The “Wow” Factor)

Technically? It’s a decoration that sits on your cake. But let’s be honest—it’s the drama. It’s the difference between “That’s a nice sponge” and “Oh my god, look at that!”
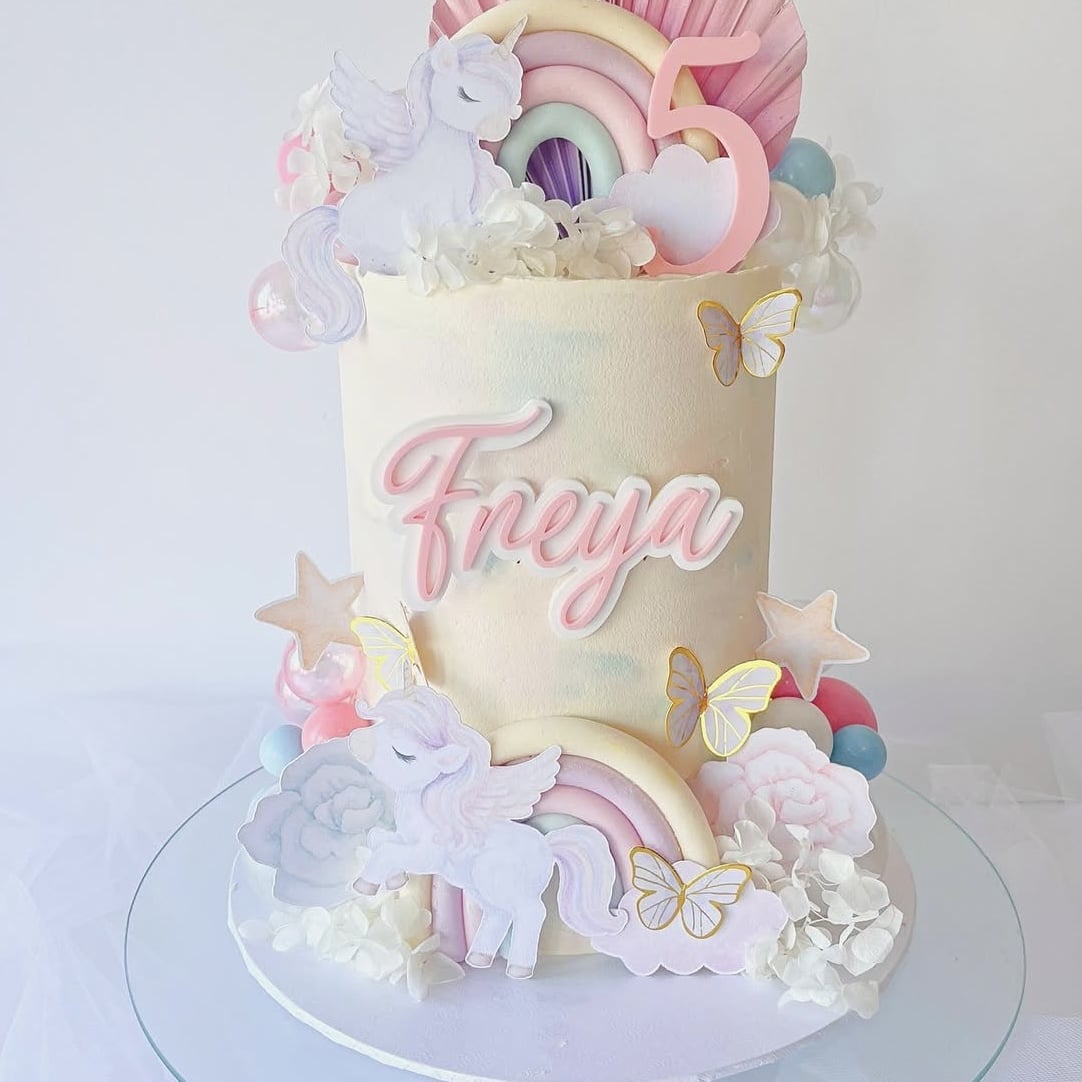
A personalised cake topper is the ultimate way to stamp personality all over your creation. Whether you’re baking for a client, a friend, or your own family, it turns a standard bake into a signature centrepiece. It’s that final, custom flourish—be it a name, a sentiment, or a logo—that makes the cake unmistakably theirs.
What Are the Different Types of Cake Toppers? (The Styles)
Not all cake toppers are created equal. Trust me, I’ve tried them all. Choosing the right style depends on your event’s vibe, the durability you need, and—let’s be honest—how much time you have left before pickup.
Here is the breakdown of the styles we create in the studio to save your sanity.
1. Classic Single Layered Cake Toppers (The Stand-Up Style)
A fan-favourite for every milestone! The classic single-layered cake topper is the perfect finishing touch for every “baking sensation.” Generally, laser cut from acrylic or wood. While wood offers a lovely rustic feel, acrylic is a top choice for its durability and food-safety—plus, it comes in a variety of stunning colours to match your theme!

Who it’s for: For the Mum or Dad who wants to turn a supermarket cake or a simple home-bake into a custom masterpiece in roughly five seconds.
Why it’s a game-changer: If your cake feels a little flat or short, a stand-up Birthday Cake topper, for example, adds that extra bit of ‘oomph’ and drama.
2. Double Layered Cake Toppers (The Showstoppers)
If you’re looking for something robust and impactful, layered acrylic cake toppers are the ultimate choice. These “showstoppers” are perfect for themed cakes with bright, bold colour schemes. By mixing textures—like Mirror Gold for a royal theme, Frosted Pastels for a baby shower, or Neon for a disco party—you can create a truly custom look. Layering allows us to incorporate intricate elements, such as a dinosaur silhouette or a royal crown, adding depth and detail without ever feeling flimsy or cluttered.

Who it’s for: The Showstopper is for those who want their cake to be the main event. If you’re planning a milestone celebration or a themed party, this is the premium choice for a bold, architectural look.
Why it’s a game-changer: It’s all about the depth! By stacking layers, we create a 3D effect that catches the light and adds a professional, high-end finish. It’s robust, vibrant, and—best of all—a heavy-duty keepsake that will look just as good in a memory box as it does on your cake.
3. Cake Charms (The Stickless Style)
While cake toppers are thego-to classic, cake charms are the defining trend of 2026. Because these designs don’t have a stick, they can be placed flat on the top tier or secured to the side, creating the illusion of floating on the frosting. Simply press your cake charms into the buttercream, pop them between tiers, or “glue” them to the front with a tiny dab of melted chocolate. Whether you go for an understated single-layer or a bold double-layered effect, they are total game-changers.
As a mother of four, I’ve navigated my fair share of themed kids’ parties—and let me tell you, these have been a game-changer for making a cake look spectacular with half the stress!

Who it’s for: The Modern Trendsetter. Perfect for the baker who loves the sleek “floating” look or “fault-line” designs. It’s also a lifesaver for the “Oops!” moments—if you have a smudge in your buttercream, a charm is the world’s most stylish way to cover it up!
Why it’s a game-changer: Creative Freedom. Since they are stickless, you aren’t restricted to the top of the cake. You can press them into the front, nestle them between tiers, or “glue” them to the side with a dab of chocolate. It allows you to decorate every surface of your masterpiece, not just the summit.
Kid-Approved Durability: As a mom, I love that they don’t have long, fragile sticks. They are much harder for little hands to snap, and they make a great keepsake for a memory box or a bedroom door after the party!
4. UV Printed Cake Toppers (High-Definition Graphics)
The process uses ultraviolet light to “cure” ink as soon as it is printed. As the printer distributes ink onto the acrylic surface, integrated UV lights immediately follow, instantly transforming the liquid ink into a durable, solid film. This creates a high-definition bond directly to the material, ensuring the image is both vibrant and waterproof.

Who it’s for: The Storyteller. This is for anyone wanting to feature a specific character, a business logo, or a cherished family photo. It’s the most personal option in our lineup, turning a cake into a literal photo album or a branded statement.
Why it’s a game-changer: Infinite Detail. Where traditional toppers are limited to block colours, UV printing allows for high-definition graphics.
How to Choose the Perfect Cake Topper for Your Cake
As a fellow baker, I’ve learned exactly what works and what doesn’t! Here are a few tips for choosing the best cake topper to bring your vision together.
1. Consider Your Cake Design
Single-Tier Cakes: Use a stand-up cake topper to add height and drama—it instantly turns a simple cake into a centrepiece. If you prefer a sleeker look, skip the height and place a name charm flat against the top of the cake instead.
Multi-Tier: Cake Charms are ideal. Since they are stickless, they can be tucked between tiers or pressed into the front “face” of the cake, allowing the tiers’ architecture to shine.
Busy Top Tiers: If your cake top is already loaded with flowers, drips, or fruit, use a Cake Charm on the front of the cake to avoid overcrowding.
2. Consider the size of your cake
Visual balance is crucial. You want to avoid a cake topper that feels lost in the centre or one that looks large enough to tip the cake over.
Width (The “Margin” Rule): To create a polished look, your topper should sit comfortably within the cake’s edges. The ideal width is roughly 0.5 to 1 inch narrower than the top tier’s diameter.
Height (Vertical Balance): Match the topper to the stature of the cake. A towering, multi-tier cake can support a tall, dramatic inscription. Conversely, a standard single-tier cake usually looks best with a lower-profile topper or a flat-lay design to avoid top heaviness.
Pro Tip: If you have a “naked” cake or a simple buttercream finish, you can get away with a larger, more intricate topper. If the cake is already covered in piping, sugar flowers, and texture, keep the topper simple.
3. Match the Celebration Style
Classic Personalisation: For a timeless look, a personalised cake topper featuring the recipient’s name and birth date is a perfect choice. This style offers clean lines and elegant simplicity, making it a versatile option for everything from intimate family gatherings to formal anniversary celebrations.
Themed Birthdays: If you are planning a milestone birthday with a specific theme—like a “Wild One” safari, a “Level Up” gaming party, or a floral “Sweet Sixteen”—Double-Layered cake toppers and charm charms are the ideal choice. They let you incorporate themed icons (like crowns, stars, or silhouettes) behind a name, using 3D depth and bold colour-blocking to tie the party theme together.
The Personal or Corporate Touch: For celebrations centred on a specific person or corporate brand, UV-printed toppers let you transfer high-definition, full-colour photographs or intricate logos directly onto a durable cake decoration.
4. Coordinate Colours & Style
Your topper should enhance your colour palette, not clash with it.
Baker Support Helpline: If you’re feeling unsure about colour combinations, just get in touch! We have a comprehensive colour guide and plenty of photos showing which shades work harmoniously together to create that “wow” factor.
How to Put a Cake Topper on a Cake: A Step-by-Step Guide
A professional baker’s guide to ensuring your topper stays secure and looks perfect from the first photo to the last slice.

Step 1: Prep Your Topper
Before anything touches the cake, ensure your decorations are food-safe and clean.
- Hygiene First: Always wash your hands thoroughly before handling the topper or the cake.
- Clean the Base: For non-edible toppers (acrylic, plastic, or wood), wipe down the pick or base—the part that will be in direct contact with the cake—with a food-safe sanitiser or alcohol wipe.
Step 2: Prep Your Cake
Preparation is the difference between a professional finish and a “smushed” design.
- The Chilling Secret: A cold cake is a stable cake. Place your cake in the refrigerator for at least 30 minutes before adding the topper. Cold buttercream and ganache are firm, which prevents fingerprints and better supports the weight of the topper.
- Find Your Angle: Rotate your cake stand until you see the “front” (usually the smoothest side). Lightly mark the centre point on top with a toothpick so you know exactly where to aim.
Step 3: Placing Vertical Toppers (Stakes & Picks)
- Grip Low: Hold the topper firmly at the base of the stem (closest to the design), not the top. Holding it too high can cause acrylic to snap under pressure.
- The Pilot Hole (Crucial for Dense Cakes): If you are serving a dense mud cake or fruit cake, do not force the topper in. Use a metal skewer to poke a “guide hole” into the cake first.
- The Drop: Push the pick straight down into the cake in one smooth motion.
- Check for Resistance: If you feel a “thud,” you’ve likely hit an internal support dowel or board. Do not force it. Pull the topper back slightly and re-insert it a few millimetres to the side.
Step 4: Attaching Floating Charms (The “Glue” Guide)
If you are attaching a stemless charm to the side or top of a cake, you need the right adhesive. This depends entirely on what your cake is covered in.
If your cake is covered in…
1. Buttercream (American, Swiss, or Italian Meringue)
- The Challenge: If the cake is cold, the buttercream will be hard and non-sticky.
- The Solution: Apply a dab of fresh buttercream or melted white chocolate to the back of the charm. Press it gently against the cold cake and hold for 10 seconds. The cold cake will “shock” the chocolate/buttercream, instantly freezing the charm in place.
2. Fondant or Marzipan
- The Challenge: These are dry, sugary surfaces.
- The Solution: Use Royal Icing or Edible Glue.
- For heavy charms: Use a stiff Royal Icing. It acts like cement.
- For light charms: You can brush a tiny amount of water onto the back of the fondant charm to make it tacky, but be careful—too much water will cause the fondant to dissolve and slide.
3. Chocolate Ganache
- The Challenge: Ganache sets very hard and can be slippery.
- The Solution: Melted Chocolate is the best bond here. “Like attracts like.” Dab a little melted chocolate onto the charm, press it, and hold it until set.
Cake Topper FAQs: The Baker’s Tips for Every Frosting
How big should my cake topper be compared to the cake?
The golden rule is to keep the topper about 0.5 to 1 inch narrower than the top tier of your cake. For example, if your top tier is 6 inches wide, a 5-inch wide topper is perfect. If the topper is the exact same width as the cake, it can look overwhelming and messy.
How do I stick a floating cake charm to my cake?
It depends on the icing you’ve used on your cake.
For Buttercream: Chill the cake first to firm it. Apply a dab of fresh buttercream or melted chocolate to the back of the charm, press it gently against the cold cake, and hold for 10 seconds.
For Fondant: Use stiff Royal Icing; it acts like cement. Alternatively, if the topper is heavy, insert a couple of cocktail sticks into the cake just below the charm to act as a temporary shelf while the glue sets.
For Ganache: Use melted chocolate as your glue.